When you enroll in this course, you'll also be enrolled in this Specialization.
Learn new concepts from industry experts
Gain a foundational understanding of a subject or tool
Develop job-relevant skills with hands-on projects
Earn a shareable career certificate
There are 6 modules in this course
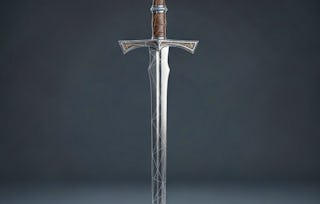
In this course you will learn to create a photo-real game prop using modern game art production techniques. You will gather reference, generate a base model, create a high polygon model, bake details onto a low poly model, and then texture and present a final portfolio piece. This course is aimed at students who have some knowledge in 3d and game art and would like to learn more advanced techniques employed in the creation of modern game assets. We will be using Maya, Zbrush, Marmoset, and Substance Painter extensively throughout the course. When you are finished you will have your own model based of of a real-world prop suitable for use in modern game engines.
To start the project we will choose an object to model, gather reference, and create a initial, rough block-in of the model. The goal is to understand as much about the object as we can before we start modeling. This will likely be the lightest workload of the course, so make sure to take the extra time to check over the essentials module and make sure you have mastered the skills covered there. Later weeks will be much more time-consuming.
What's included
9 videos2 readings3 assignments1 peer review
Show info about module content
9 videos•Total 93 minutes
Essentials Normals and Baking•8 minutes
Essential Modeling Tips•8 minutes
Essential Modeling Tools•19 minutes
Essentials Substance Painter•9 minutes
Essentials ZBrush•10 minutes
01 Reference•8 minutes
02 Image Planes•7 minutes
03 Initial Block-In•20 minutes
04 Refining Initial Block-In•4 minutes
2 readings•Total 20 minutes
Essential Skills/Software•10 minutes
Choosing Your Project•10 minutes
3 assignments•Total 30 minutes
Essentials Quiz•30 minutes
Planning and Reference•0 minutes
Rough Block-In•0 minutes
1 peer review•Total 60 minutes
Project 1: Reference & Rough Block-In•60 minutes
Week 2: Mid-Poly Block-In Model
Module 2•2 hours to complete
Module details
In this module you will work to create the form of your model. This mid-poly block-in will not be textured, nor smoothed into a high resolution model. The goal is to create a mesh that is accurate to your reference that can become the starting point for your high and low poly models. This is often the most challenging part of the process.
What's included
8 videos1 assignment1 peer review
Show info about module content
8 videos•Total 83 minutes
01 Mid-Poly Objective Lens•15 minutes
02 Mid-Poly Eye Piece Swivel•9 minutes
03 Mid-Poly Eye-Piece Viewer•7 minutes
04 Mid-Poly Body•16 minutes
05 Mid-Poly Battery•4 minutes
06 Finish Mid-Poly Body•15 minutes
07 Mid-Poly Swivel Mount•9 minutes
08 Mid-Poly Strap Mount•9 minutes
1 assignment
Mid-Poly Modeling•0 minutes
1 peer review•Total 60 minutes
Project 2: Mid-Poly Model•60 minutes
Week 3: High-Poly Model
Module 3•3 hours to complete
Module details
In this module you will take the low poly block in and generate a high polygon mesh that is accurate to the real world model as possible. We will be using a combination of sub division modeling and . The sky is the limit with poly counts, this model will never be UV unwrapped, it will just be used to generate texture maps for the game-ready version.
What's included
10 videos2 assignments1 peer review
Show info about module content
10 videos•Total 104 minutes
01 High-Poly Dial•7 minutes
02 High-Poly Eye Piece Swivel•6 minutes
03 High-Poly Eye Piece•5 minutes
04 High-Poly Swivel Mount•6 minutes
05 High-Poly Objective Lens•14 minutes
06 High-Poly Battery & Switch•14 minutes
07 High-Poly Body Cap•12 minutes
08 High-Poly Prepping the Body•12 minutes
09 High-Poly Body•10 minutes
10 High-Poly Floaters•18 minutes
2 assignments
Sub Division Modeling•0 minutes
ZBrush Modeling•0 minutes
1 peer review•Total 60 minutes
Project 3: High-Poly Model•60 minutes
Week 4: Low-Poly Model
Module 4•2 hours to complete
Module details
In this module you will take the mid-poly model from week 2 and reduce the geometry. This is the model we will be UV unwrapping and baking maps to. The goal for this model is to still achieve the silhouette of our object while using fewer vertices than the mid or high poly model.
What's included
9 videos1 assignment1 peer review
Show info about module content
9 videos•Total 49 minutes
Low Poly Dial•5 minutes
Low Poly Objective Lens•9 minutes
Low Poly Strap Mounts•4 minutes
Low Poly Battery Pack•4 minutes
Low Poly Battery Switch•3 minutes
Low Poly Swivel Mount•4 minutes
Low Poly Eye Piece•5 minutes
Low Poly Finishing Body•12 minutes
UV Layout•5 minutes
1 assignment
Low-Poly•0 minutes
1 peer review•Total 60 minutes
Project 4: Low-Poly Model•60 minutes
Week 5: PBR Texturing
Module 5•3 hours to complete
Module details
In this module you will take your low-poly model and add back the missing detail from the high-poly by baking texture maps. You will also use Substance Painter to add color, material, and micro-details not present in the high poly. This is where the model will start to become photo-real. The goal here is to take a well crafted model and use texture maps to bring it to life.
What's included
9 videos2 assignments1 peer review
Show info about module content
9 videos•Total 103 minutes
Preparing for Baking•4 minutes
Baking Texture Maps•11 minutes
Creating Initial Textures in Substance Painter•10 minutes
Adding Height-Map Details•18 minutes
Creating a Texture Stencil•8 minutes
Using Texture Stencil•9 minutes
Additional Details•9 minutes
Texturing Surface Noise, Dirt, & Wear•21 minutes
Indicator Light•13 minutes
2 assignments
Baking Texture Maps•0 minutes
Texturing•0 minutes
1 peer review•Total 60 minutes
Project 5: PBR Texturing•60 minutes
Week 6: Final Project and Presentation
Module 6•1 hour to complete
Module details
This last week is set aside for you to spend more time polishing you model and going back to fix any issues that might have popped up during production. Often you will get to the end of a project and realize there were things you should have approached differently. Taking the feedback you received from the previous week's project, resubmit a final, portfolio ready version of your work. Our goal is to finish the course with the best possible looking final result.
What's included
4 videos1 assignment1 peer review
Show info about module content
4 videos•Total 28 minutes
Preparing for Final Render•2 minutes
Render Settings in Marmoset•13 minutes
Lighting An Asset in Marmoset•4 minutes
Final Presentation•8 minutes
1 assignment
Presentation•0 minutes
1 peer review•Total 60 minutes
Final Project: Model Presentation•60 minutes
Earn a career certificate
Add this credential to your LinkedIn profile, resume, or CV. Share it on social media and in your performance review.
Instructor
Instructor ratings
Instructor ratings
We asked all learners to give feedback on our instructors based on the quality of their teaching style.
Michigan State University has been advancing the common good with uncommon will for more than 150 years.
One of the top research universities in the world, MSU pushes the boundaries of discovery and forges enduring partnerships to solve the most pressing global challenges while providing life-changing opportunities to a diverse and inclusive academic community through more than 200 programs of study in 17 degree-granting colleges.
Do I have to use Maya/ZBrush/Substance/Marmoset? Can I use something else?
The course is designed with these programs in mind due to their place as industry standard tools. You may use other tools if you wish (blender, gimp, etc) and apply the same techniques to those programs, but keep in mind the course was designed for Maya, Zbrush, Substance, and Marmoset
Why do I need to present my models in Marmoset if I just want to make models for games?
While making models for games is all about getting it into the game, presenting your work in the best possible light is a big part of art. For personal or portfolio projects you should always take the time to present them. A few hours of lighting and rendering in marmoset will get much better results than spending those hours further polishing your model and textures.
Wow, this seems like too much work!
You will find the difficulty of your project has a lot to do with the complexity of the model you attempt to create. If it is your first time tackling these subjects I recommend keeping it simple for this course (a screwdriver rather than a car). You can always spend more time later improving and polishing your work after the course. Perfect is the enemy of done!
Does my model have to be of a real-world object, can it be fantasy, an illustration, or my own original design?
Every problem is a combination of what to do and how to do it, it's best if you aren't trying to do both at once. Most 3d artist work from image or concepts generated by another artists, so being able to follow someone else's design is an essential skill.
As for concept art, it's best to stick to real world things. Just like 2d artist start drawing with still life, 3d artists can learn a lot by recreating a real world object. Paintings lie, and concept art can often contain lots of visual shorthand, they are sketches meant to convey the idea the artist is going for. It will be much easier to find all the reference you will need from a real world object.
You could pick a movie or tv prop, as long as you can find enough reference. Our goal in this course is to learn how to take an object and create a photo-real facsimile of it. When you have done that, you will be much more able to make the kinds of assumptions and leaps in logic you will need to work with limited reference.
When will I have access to the lectures and assignments?
To access the course materials, assignments and to earn a Certificate, you will need to purchase the Certificate experience when you enroll in a course. You can try a Free Trial instead, or apply for Financial Aid. The course may offer 'Full Course, No Certificate' instead. This option lets you see all course materials, submit required assessments, and get a final grade. This also means that you will not be able to purchase a Certificate experience.
What will I get if I subscribe to this Specialization?
When you enroll in the course, you get access to all of the courses in the Specialization, and you earn a certificate when you complete the work. Your electronic Certificate will be added to your Accomplishments page - from there, you can print your Certificate or add it to your LinkedIn profile.
Is financial aid available?
Yes. In select learning programs, you can apply for financial aid or a scholarship if you can’t afford the enrollment fee. If fin aid or scholarship is available for your learning program selection, you’ll find a link to apply on the description page.